Terraform Datasource : Remote state use-case
In One of my interview, I was asked this below question to which I failed to answer it!!
“Let’s say you have to create two similar infrastructure module in two different regions of any of your favourite cloud environment. The first infra module is already created by X team and you need to have same configuration in your module.”
My Initial approach : Go to that X team and ask for source files.
Let’s assume they are very protective about their source files and they say we cannot give you whole set of files, but we can help you with our workspace name and outputs.
Now with these very minimal data how I can assure that my infra will be similar to X team.??
I was not aware of concept and functionality of terraform datasource during that time, otherwise I would have cracked the interview.
Data sources enable Terraform to use the information determined outside of Terraform, represented by different separate Terraform states or code, or changed by functions.
In other words, Cloud infrastructure, applications, and services transmit data, which Terraform can query and perform managing data sources.
For example, terraform manages data sources to retrieve information from cloud provider APIs, such as availability zone IDs or data about the piece of your infrastructure through the outputs of different Terraform states.
In this article, I am going to discuss how we can transfer data from one workspace to another workspace using terraform remote state datasource.
Prerequisites
- A Google Cloud Platform account. If you do not have a GCP account, create one now. This tutorial can be completed using only the services included in the GCP free tier.
- Terraform 0.15.3+ installed locally.
Next, we need to set-up GCP
After creating GCP account, create following resources to enable Terraform to provision infrastructure:
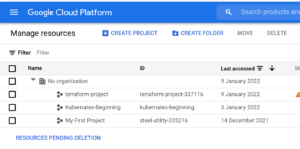
- A GCP Project: GCP organizes resources into projects. Create one now in the GCP console and make note of the project ID. You can see a list of your projects in the cloud resource manager.In my case, I have created a project called
terraform-project-337116
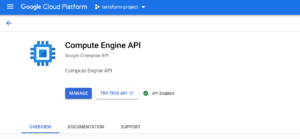
- Google Compute Engine: Enable Google Compute Engine for your project in the GCP console. Make sure to select the project you are using to follow this tutorial and click the “Enable” button.
- A GCP service account key: Create a service account key to enable Terraform to access your GCP account. When creating the key, use the following settings:
- Select the project you created in the previous step.
- Click “Create Service Account”.
- Give it any name you like and click “Create”.
- For the Role, choose “Project -> Editor”, then click “Continue”.
- Skip granting additional users access, and click “Done”.
- After you create your service account, download your service account key.
- Select your service account from the list.
- Select the “Keys” tab.
- In the drop down menu, select “Create new key”.
- Leave the “Key Type” as JSON.
- Click “Create” to create the key and save the key file to your system.
Now your GCP is completely set-up to integrate with terraform.
- Create a directory with some valid name (Eg:
gcp-terraform-datasource-intg) and get into same directory. Along with this create terraform workspace with name 'development' and create below mentioned .tf files in same workspace
$ mkdir gcp-terraform-datasource-intg
$ cd gcp-terraform-datasource-intg
$ terraform workspace new development
$ terraform workspace select development
"""""
Next create couple of .tf files.
"""""
$ touch main.tf
$ touch variables.tf
$ touch provider.tf
$ touch network.tf
$ touch outputs.tf
"""""
Copy service account key json file into this directory (This file you need to download into your local)
- Create a folder with name ‘template’ and create .tpl file inside template directory (eg : Here, I have created a file with name
install_flask.tpl) - This install_flask.tpl holds content for metdata-script, which will get execute when our GCP instance get spawned up via terraform scripts
"""""
$ cd gcp-terraform-datasource-intg
$ mkdir template
$ cd template
$ touch install_flask.tpl
"""""
Copy below contents into .tpl file
""""""
#!/bin/bash
sudo apt-get update -y
sudo apt-get install -yq build-essential python-pip rsync
sudo apt-get install wget -y
pip install flask
sudo touch /tmp/app.py
sudo mkdir /tmp/templates
sudo chmod 777 /tmp/templates
sudo touch /tmp/templates/index.html
sudo cat << "EOF" > /tmp/templates/index.html
<!DOCTYPE html>
<html>
<style>
body {font-size: 100px;
}
p {text-align: center;}</style>
<body>
<span style='font-size:500px;text-align:center'>🌩</span>
<p>Welcome to the Cloud 😃</p>
</body>
</html>
EOF
sudo chmod 777 /tmp/templates/index.html
sudo cat << "EOF" > /tmp/app.py
from flask import Flask, render_template
app = Flask(__name__)
@app.route('/')def index():
return render_template('index.html')app.run(host='0.0.0.0')
EOF
sudo chmod 777 /tmp/app.py
sudo python /tmp/app.py
"""""
Basically, the above script will install/set-up python flask in GCP instance and when we try to access , it will give output as ‘Welcome to the cloud’ with nice emojis.
Now copy below content into variables.tf
variable "project" {default = "terraform-project-337116"
}
variable "region" {default = "us-central1"
}
variable "image_family" {default = "debian-9"
}
variable "image_project" {default = "debian-cloud"
}
variable "vpc_name" {default = "terraform-flask-westnetwork"
}
variable "zone" {default = "us-central1-c"
}
variable "machine_type" {default = "f1-micro"
}
variable "firewall_name" {default = "fw"
}
- Give attention to
region, here we are creating instance in us-central1 region. Rest of the fields are self explanatory, we are assigning variables and we use these variables in rest of .tf files. Note - Update project variable with your project-id
Next copy below content into provider.tf file
terraform {required_providers {google = {source = "hashicorp/google"
version = "3.5.0"
}
}
}
provider "google" {credentials = file("terraform-gcp.json")project = var.project
region = var.region
}
Next copy below contents into network.tf file
resource "google_compute_network" "vpc_network" {project = var.project
name = var.vpc_name
auto_create_subnetworks = true
}
resource "google_compute_firewall" "fw" {name = var.firewall_name
network = google_compute_network.vpc_network.name
allow {protocol = "tcp"
ports = ["5000"]
}
}
- Here we are creating virtual private cloud resource and assigning firewall rule in that VPC to allow 5000 port.
Next copy below contents into main.tf
data "google_compute_image" "flask_image" {family = var.image_family
project = var.image_project
}
data "template_file" "webapp" {template = file("${path.module}/template/install_flask.tpl")}
// Terraform plugin for creating random ids
resource "random_id" "instance_id" {byte_length = 8
}
// A single Compute Engine instance
resource "google_compute_instance" "vm_instance" {name = "flask-vm-${random_id.instance_id.hex}"machine_type = var.machine_type
zone = var.zone
boot_disk {initialize_params {image = data.google_compute_image.flask_image.self_link
}
}
metadata_startup_script = data.template_file.webapp.rendered
network_interface {network = google_compute_network.vpc_network.name
access_config {// Include this section to give the VM an external ip address
}
}
}
- Let’s see functionality of each block of main.tf file.
data "google_compute_image" "flask_image" {family = var.image_family
project = var.image_project
}
- Here we are creating local datasource to get google_compute_image.
Reference: https://registry.terraform.io/providers/hashicorp/google/latest/docs/resources/compute_image
data "template_file" "webapp" {template = file("${path.module}/template/install_flask.tpl")}
- Here in this block we are creating template_file datasource to read install_flask.tpl file from relevant path. In further steps, this datasource is provided as input to metadata script.
Reference : https://registry.terraform.io/providers/hashicorp/template/latest/docs/data-sources/file
// Terraform plugin for creating random ids
resource "random_id" "instance_id" {byte_length = 8
}
- The above block contains code to generate random IDs which gets append to instance name.
// A single Compute Engine instance
resource "google_compute_instance" "vm_instance" {name = "flask-vm-${random_id.instance_id.hex}"machine_type = var.machine_type
zone = var.zone
boot_disk {initialize_params {image = data.google_compute_image.flask_image.self_link
}
}
metadata_startup_script = data.template_file.webapp.rendered
network_interface {network = google_compute_network.vpc_network.name
access_config {// Include this section to give the VM an external ip address
}
}
}
- In above block, we are creating single instance in
us-central1region with boot_disk attached to same.
metadata_startup_script = data.template_file.webapp.rendered
- In above block, using template datasource which we created earlier, we pass .tpl file as input to metadata script. This metadata script will install/configure python flask in gcp instance.
network_interface {network = google_compute_network.vpc_network.name
access_config {// Include this section to give the VM an external ip address
}
}
- Here we are configuring
network_interfacefor vpc and usingaccess_configblock we are assigning VM an external ip address
Next copy below content into outputs.tf
output "ip" {value = google_compute_instance.vm_instance.network_interface.0.access_config.0.nat_ip
}
output "script"{value = google_compute_instance.vm_instance.metadata_startup_script
sensitive = true
}
- Here we are saving ip-address and script content (as sensitive content). When we use
sensitive = true, terraform will not print output results of script in console.
Now as all tf files are in place, we are ready to execute terraform commands.
""""
$ terraform init
$ terraform validate
$ terraform plan
$ terraform apply — auto-approve
""""
Once terraform creates and configure infrastructure in google cloud environment, you should see outputs in your console similar to below
Changes to Outputs: + ip = (known after apply) + script = (sensitive value) random_id.instance_id: Creating… random_id.instance_id: Creation complete after 0s [id=uM9XuDmrGRQ] google_compute_network.vpc_network: Creating… google_compute_network.vpc_network: Still creating… [10s elapsed] google_compute_network.vpc_network: Still creating… [20s elapsed] google_compute_network.vpc_network: Still creating… [30s elapsed] google_compute_network.vpc_network: Creation complete after 39s [id=projects/terraform-project-337116/global/networks/terraform-flask-vpcapp-network] google_compute_firewall.fw: Creating… google_compute_instance.vm_instance: Creating… google_compute_firewall.fw: Creation complete after 9s [id=projects/terraform-project-337116/global/firewalls/fwapp] google_compute_instance.vm_instance: Still creating… [10s elapsed] google_compute_instance.vm_instance: Creation complete after 19s [id=projects/terraform-project-337116/zones/us-central1-c/instances/flask-vm-b8cf57b839ab1914] Apply complete! Resources: 4 added, 0 changed, 0 destroyed. Outputs: ip = “34.122.168.105” script = <sensitive>
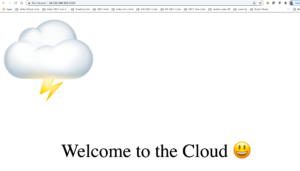
- Now try to access above external IP address with port 5000 (Eg : http://34.122.168.105:5000)
You should see “Welcome to the cloud” message with some emojis as below
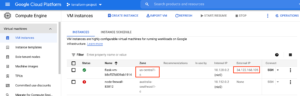
Meanwhile, you can see your created instance from gcp console.Pay attention to region , where instance got created in ‘us-central1’
Next, we shall create instance with same configuration in us-west1 region using terraform-remote-state datasource.
- Now create one more terraform workspace with name ‘test’
$ terraform workspace create test
$ terraform workspace select test
- Change
regionfromus-central1tous-west1in variables.tf file. Along with this update name for vpc and firewall, just to differentiate one from development workspace resources
variable "project" {default = "terraform-project-337116"
}
variable "region" {default = "us-west1"
}
variable "image_family" {default = "debian-9"
}
variable "image_project" {default = "debian-cloud"
}
variable "vpc_name" {default = "terraform-flask-westnetwork"
}
variable "zone" {default = "us-west1-b"
}
variable "machine_type" {default = "f1-micro"
}
variable "firewall_name" {default = "fwwest"
}
Now add terraform_remote_state datasource block in main.tf file as below
data "terraform_remote_state" "developmentwsdata" {backend = "local"
config = {path = "${path.module}/terraform.tfstate.d/test/terraform.tfstate"}
}
- Here path should be relevant path where your
terraform.tfstatefile is stored. In general, when we create terraform workspace, terraform will create directory with nameterraform.tfstate.dand we can list all created workspace inside this directory. So, in general your path should be - path =
"<path to folder where .tf files are located>/terraform.tfstate.d/<your source workspace>/terraform.tfstate"
Next update metadata_script line in main.tf as below
metadata_startup_script = data.terraform_remote_state.developmentwsdata.outputs.script
- where we are reading script from source workspace (development) as output variable and providing same as input to target workspace (test), so that same configuration is reflected in newly created instance.
- If everything goes fine, you should see output log similar to below
Changes to Outputs: + ip = (known after apply) random_id.instance_id: Creating… random_id.instance_id: Creation complete after 0s [id=yMvh2E-5IWQ] google_compute_network.vpc_network: Creating… google_compute_network.vpc_network: Still creating… [10s elapsed] google_compute_network.vpc_network: Still creating… [20s elapsed] google_compute_network.vpc_network: Still creating… [30s elapsed] google_compute_network.vpc_network: Creation complete after 39s [id=projects/terraform-project-337116/global/networks/terraform-flask-westnetwork] google_compute_firewall.fw: Creating… google_compute_instance.vm_instance: Creating… google_compute_firewall.fw: Creation complete after 8s [id=projects/terraform-project-337116/global/firewalls/fwwest] google_compute_instance.vm_instance: Still creating… [10s elapsed] google_compute_instance.vm_instance: Creation complete after 17s [id=projects/terraform-project-337116/zones/us-west1-b/instances/flask-vm-c8cbe1d84fb92164] Apply complete! Resources: 4 added, 0 changed, 0 destroyed. Outputs: ip = “34.82.35.198”
- Now again try to access external ip address with 5000 port (eg : http://34.82.35.198:5000),
You should see “Welcome to the cloud” message
- You can validate from gcp console that two separate instances are created in two regions us-central1 and us-west1 respectively.

- Lastly, don’t forget to clean up your infrastructure using terraform destroy command
$ terraform destroy — auto-approve
This proves we have successfully configured two separate instances with similar configuration in two separate regions using terraform remote state datasource.
Complete source code is available here https://github.com/sheldon-cooper26/gcp-terraform-datasource-application
Hope you liked this post. Thanks for reading!!
Thanks and Regards,
Tapan Hegde


Comments
Post a Comment